Current Activity
Jim Chapple is now working full time on iphone/ipod touch and iPad applications.
Jim Chapple also works on Mac OS X Apps.
Please email Jim Chapple for support issues, information and quotes.
Driving Monitor
Concerned about your driving or the driving of a son or daughter? Need some way to get across to yourself or them that they are driving in an uncertain manner? It's not easy to do since without proof every statement of yours about unsafe actions can be countered with 'Well I didn't think it was'. But now with the Driving Monitor App you can have your proof. It is an objective analysis of the motions of the car. It detects such events as overly sharp turns, heavy acceleration, hard braking & fast lane changes and shows the driver in real-time when these events occur. Placed at the periphery of the drivers vision the changing colours of the screen subtly inform the driver when they are being dangerous and when they are being safe.
- Use the accelerometer in your iphone or ipod touch to monitor your driving style. By being able to see what is deemed safe and what is progressively more unsafe you can modify your driving style to make you a better driver.
- Each trip can be recorded and then shown on a Graphical representation of the trips. You can easily see whether you are improving or not.
- Adjust the various sensitivities to increase your skills at driving safely to keep the accelerometer reading within the safe green zone.
- Colour changes to the main body of the screen are used to indicate the level of safety.
- You will need a cradle to hold the device either vertically or horizontally.

FAQ: This App does not work properly it keeps on crashing, why?
Sometimes Apps just do not download properly. You will need to download it again, for free, using itunes. See Apple Support Pages
About half way down the page there's a set of instructions that starts 'Reinstall the affected application'.
Once iTunes has it then you sync your device and it should then work. If it does not then please to contact me.
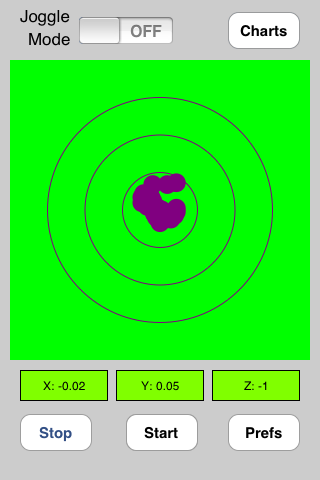
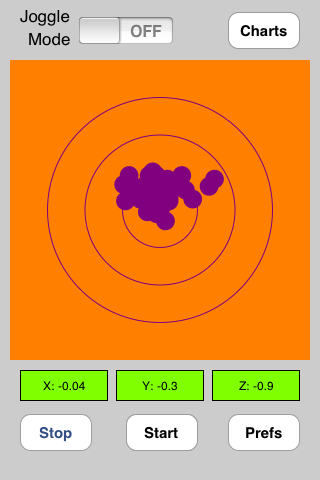
When the Application StartsThis is the main screen of the App. The center part of the screen (coloured green) has 3 circles drawn on it. The inner circle is the green zone. As long as all of the last 50 accelerometer readings stay within this zone then the screen remains green. The next circle is the amber zone. If any of the 50 accelerometer readings stray out of the green zone and into this ring then the screen turns amber. The next circle out is the red zone. If any of the 50 accelerometer readings stray out of the amber zone and into this ring then the screen turns red. Finally, all of the screen outside the final circle is the black zone. If any of the 50 accelerometer readings stray out of the red zone and into this ring then the screen turns black. The App records the last 50 readings and draws them on the screen as purple dots. As these stray in and out of the various areas the colour of the screen changes. The colour is always the worst colour based on the last 50 readings. So if a single reading is red and all the others are green the screen remains red. It takes approximately 5 seconds for a reading to be flushed from the 50 last readings so a red screen will remain up for 5 seconds except that it can be overridden by a new reading that is in the black zone. The aim is to keep the accelerometer readings in the green zone indicating that acceleration, braking and turning are smooth and calm. It is acceptable to stray into the amber zone but readings in the red and black zone definitely indicate heavy acceleration, hard braking and sharp turns. |
|
I have found using the cradle to hold it vertically under the rear view mirror allows me to drive safely and still in my peripheral vision see the colour changes that means my driving has strayed out of the safe green zone. Note: Although this App can inform you when you are under heavy acceleration, sharp braking and abrupt turns it cannot substitute for your skills as a safe driver. If the situation warrants any of the actions the device is monitoring for, say to avoid a crash, then ignore what the App is recording and do what you know to be correct. Just like all in-car devices there are times they have to be ignored to remain safe. |
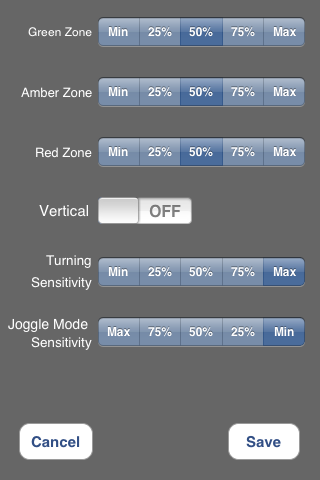
The Apps Preferences PagesThere are a number of preferences for the Apps. They can be used in many differing combinations to suit what you are trying to achieve. Green Zone. This governs the size of the inner circle. Min sets the zone to the smallest size and means it is much harder to keep the readings from straying out of this zone. Max sets it to its largest size and makes it much easier to keep the readings in the green zone. The 25%, 50% and 75% settings are just that between the Min and Max sizes. Amber Zone. This governs the size of the amber area. Settings are the same as the green. Min will make the ring used for Amber to be small and so it will be harder to keep the readings from straying into the red zone. Red Zone. Same as amber really except that the smaller the zone the harder it will be to keep the readings from straying into the black. These three readings taken in combination vary how hard it is to keep your driving within the safe green and amber zones and how easy it is to register an unsafe red and black zone reading. To start it is probably best to make all the zones 'Max'. Once you have mastered these settings and can drive without many reds or blacks then you can reduce the zones to 75% thereby making it just that little bit easier to stray into the red and black zones. And so on until all zones are set to 'Min'. At this point you will have to be driving carefully to not register lots of red and black readings. Another option would be to set the Green Zone to 'Max' and the other two zones to 'Min' and treat anything other than green as unsafe. So it is relatively to keep the readings in the green zone but once you are outside it is much easier to register an red or black reading. Vertical Toggle switch. The App needs to know if the device is vertically or horizontally held. Set this to match orientation of the device. If you do not then the readings will immediately stray into the red or black zones. Turning Sensitivity setting. The acceleromter has proved very sensitive to turns so much so that a means to ramp down the changes attributed to turns has been added. Setting it to 'Min' means that the readings associated with turning are reduced and therefore the likelihood of straying out of the green zone are reduced. Setting it to 'Max' just takes the raw reading and uses that. Joggle Mode Sensitivity. This setting is used when the Joggle Mode is being used (see the switch on the main page). This was added because the accelerometer is extremely sensitive to bumps, holes, etc in the road. If this mode is off you can easily have black zone readings when driving over a pothole or bump. These black and red readings skewed the real readings. Joggle Mode sensitivity is used with the Joggle Mode switch to ramp the readings of the accelerometer so that sudden one-off large changes in readings are reduced. When Joggle Mode is on and 'Min' sensitivity is selected then the raw readings are not used instead the difference between the new reading and the last reading are compared and the new reading is changed to be the old reading plus one fifth of the difference between the old and new readings. 'Max' setting just uses the raw values. What this means is that if the old reading was in the green zone and the new reading is in the black zone this immediate change will be ignored. The new reading will be set so that it is moving towards where the real reading is but only by part of the change. If the next real reading is back in the green zone then that indicated a one-off black zone reading and it was not a real indication of bad driving. However, if the next reading is still in the black zone then the reading will be adjusted again but this time it will be closer to the black reading. If the reading continue to be black then even on 'Min' sensitivity after half a second the current reading will be the same as the black reading. |

Journey's GraphThis view can be seen by selecting Graphs on the main screen. It shows up to 30 journey recordings at a time. Each column is one recording. At the bottom can be seen which journeys are being shown. Journey one is the latest recording. The higher the number the older the recording. Swipe left and right to see older and newer sets of recordings. To improve your driving you should be striving to have more green than amber, more amber than red and more red than black with as little red and black as possible. So if your driving is improving then from left to right (the right hand side is the newest recording) you would expect to see the amount of green increasing, less amber, even less red and hopefully no black. |
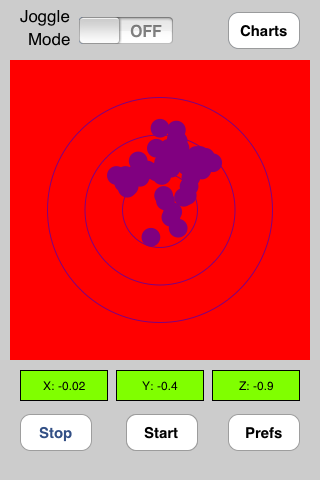
The Main Screen - Red Zone activeThis view shows the monitor active and that some very hard braking has been occurring. Readings have strayed well into the red and amber zones and quite consistently. Even if the readings went back into the green zone straight after this it would take at least 5 seconds for the screen to turn back to green. |
The Main Screen - RecordingsThis view shows the recording already active. To start the recording select 'Start'. Make sure that the dots are all in the center of the screen. If not then adjust the cradle until they are. While recording is active you cannot select to view the Preferences nor to view the charts. It is not safe to do this. The Joggle Mode switch can be changed while driving but you should be careful when you do this. It is generally better to either leave it on or off. To stop a recording then wait until it is safe to do so and then select 'Stop'. A dialog will be shown asking if you want to save the recording or not or cancel the stop. Generally, you will want to record the journey so select Yes but if, for some reason, you do not want to the select No. |